Get Started with TON
Set up your first application on TON Blockchain from scratch and discover its speed, reliability, and essential concepts of asynchronous thinking.
If you are completely new to programming, this guide is the best choice for you.
This learning path contains 5 modules and should take you around 45 minutes.
🛳 What you will learn
In this tutorial, you'll learn how to easily make blockchain transactions using JavaScript. While you could learn to do it without this tutorial, this approach is convenient and user-friendly.
- You will make your own TON Wallet with Tonkeeper
- You will use a Testnet faucet to top up your wallet for testing.
- You will understand essential concepts of TON smart contracts (Addresses, Cells)
- You will learn how to interact with TON using TypeScript SDK and API provider
- You will compile your first transaction using NFT Miner console application
You're going to mine an NFT rocket achievement!!!
As the first miners on TON, you will go through the Proof-of-Work smart contract and finally mine a secret reward for your TON wallet. Check it out:
Our goal for today is to mine an NFT! This achievement will stay with you forever.
Finally, you are able to mine this NFT achievement even in mainnet. (it costs only 0,05 TON!).
Mining on TON Blockchain
Today, we are going to teach our prospective builders how to mine on TON Blockchain. This experience will allow all of you to understand the significance of mining and why Bitcoin mining helped revolutionize the industry.
Although the PoW Giver smart contract framework, which defined the initial mining process that laid the foundation for TON, was completed at launch, the last TON was mined in June 2022 to conclude TON’s Proof of Work (PoW) token distribution mechanism. That said, with our recent transition to Proof of Stake (PoS), the era of staking on TON has just begun.
Now, let’s focus on the first steps to becoming a TON Developer and learn how to mine an NFT on TON! Below is an example of what we're aiming to create.
It’s possible to create a miner in about half an hour if we keep focused on the task at hand.
🦄 Getting started
To get started, all developers will make use of the following components:
- Wallet: You need a non-custodial wallet to store an NFT in Testnet mode.
- Repository: We’ll use a ready-made template designed specifically for you.
- Developer Environment: Developers will need to determine whether they want to mine using a local or cloud environment.
Download and Create a Wallet
To start, you’ll need a non-custodial wallet that allows you to receive and store your TON. For this guide, we are using Tonkeeper. You’ll need to enable Testnet mode within the wallet to be able to receive Testnet Toncoins. These tokens will be used later on to send a final minting transaction to the smart contract.
With a non-custodial wallet, the user owns the wallet and holds the private key themselves.
To download and create a TON wallet follow these simple steps:
- Install the Tonkeeper app on your smartphone. It can be downloaded here.
- Next, you’ll need to enable test mode within Tonkeeper.
Easy! Let's go to the development now.
Project setup
To make your life easier and skip routine low-level tasks, we will use a boilerplate.
Note, you'll need to sign in to GitHub for further work.
Please use the ton-onboarding-challenge template to create your project by clicking the “Use this template” button and selecting the “Create a new repository” tab as shown below:
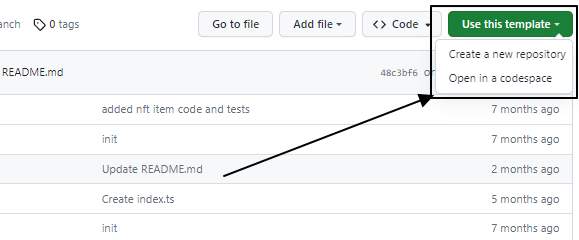
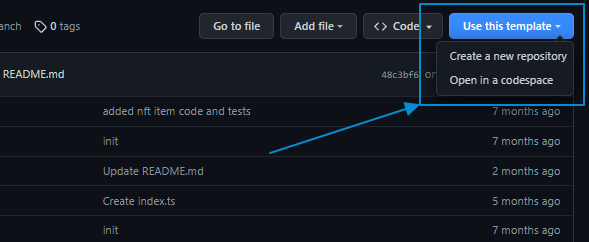
After completing this step, you’ll have access to a highly performant repository that can serve as your miner's core. Congratulations! ✨
Development Environments
The next step is to choose which developer environment is best suited to your needs, experience level, and overall skill-set. As you can see, it is possible to carry out this process by using either a cloud-based or local environment. Developing on the cloud is often considered simpler and easier to get started. Below, we’ll outline the steps required for both approaches.
Make sure you have opened the repository in your GitHub profile that was generated from the template in the previous step.


Local and Cloud Development Environments
-
For users unfamiliar with JavaScript, it can be challenging to use a JavaScript IDE, especially if your computer and tooling systems are not configured for this purpose.
-
However, if you're familiar with NodeJS and Git and know how to work with
npm, you may find it more comfortable to use a local environment.
Cloud Codespaces
If you choose the cloud development environment it's easy to get started by first selecting the Code tab and then by clicking on the Create codespace on master button within the GitHub repository like shown below:
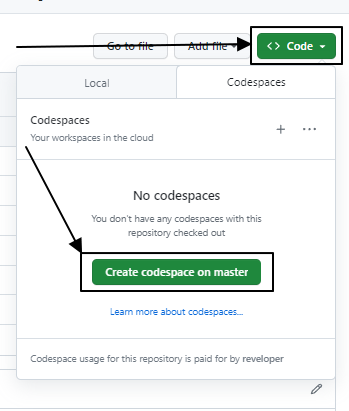
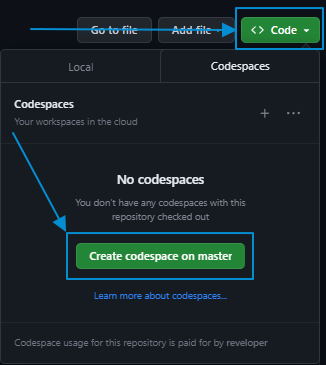
After completing this step, GitHub will create a special cloud workspace that allows you to access the VSCode Online IDE (Visual Studio Code Online Integrated Development Environment).
Once access is granted (the codespace typically starts in about 30 seconds), you'll have everything required to begin without the need to install Git, Node.js, or other developer tools.
Local Development Environments
To set up a local development environment, you'll require access to these three essential tools:
- Git: Git is an essential tool that every developer needs to work with repositories. It can be downloaded here.
- NodeJS: Node.js is the JavaScript and TypeScript runtime environment typically used for application development on TON. It can be downloaded here.
- JavaScript IDE. JavaScript IDE’s are typically used for development within local development environments. An example of this case is Visual Studio Code (VSCode).
To get started, you’ll need to clone your GitHub repository boilerplate and open the correct repository in your Integrated Development Environment (IDE).
Running Scripts
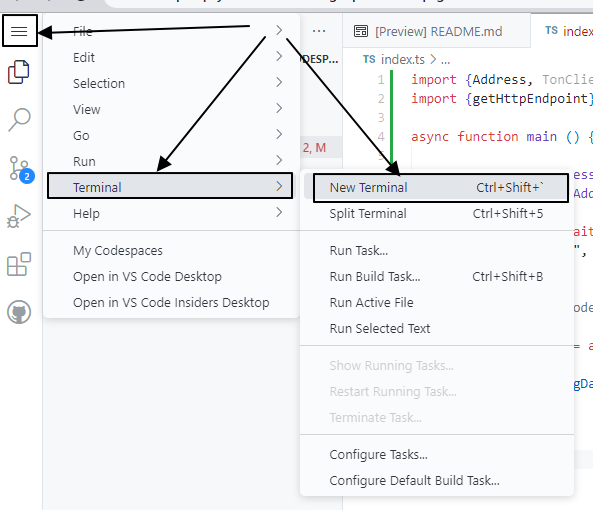
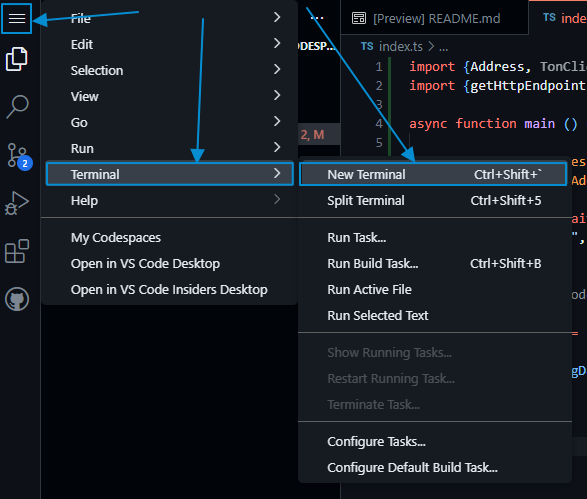
In this guide, you'll need to run TypeScript scripts. All commands, such as running scripts or installing modules, are executed through the command line, which is located in the IDE's Terminal workspace. This workspace is typically found at the bottom of the IDE.
For example, in the Cloud Codespaces, you should open the Terminal workspace (if it is not already open):
Enter commands in this window and execute them with Enter:
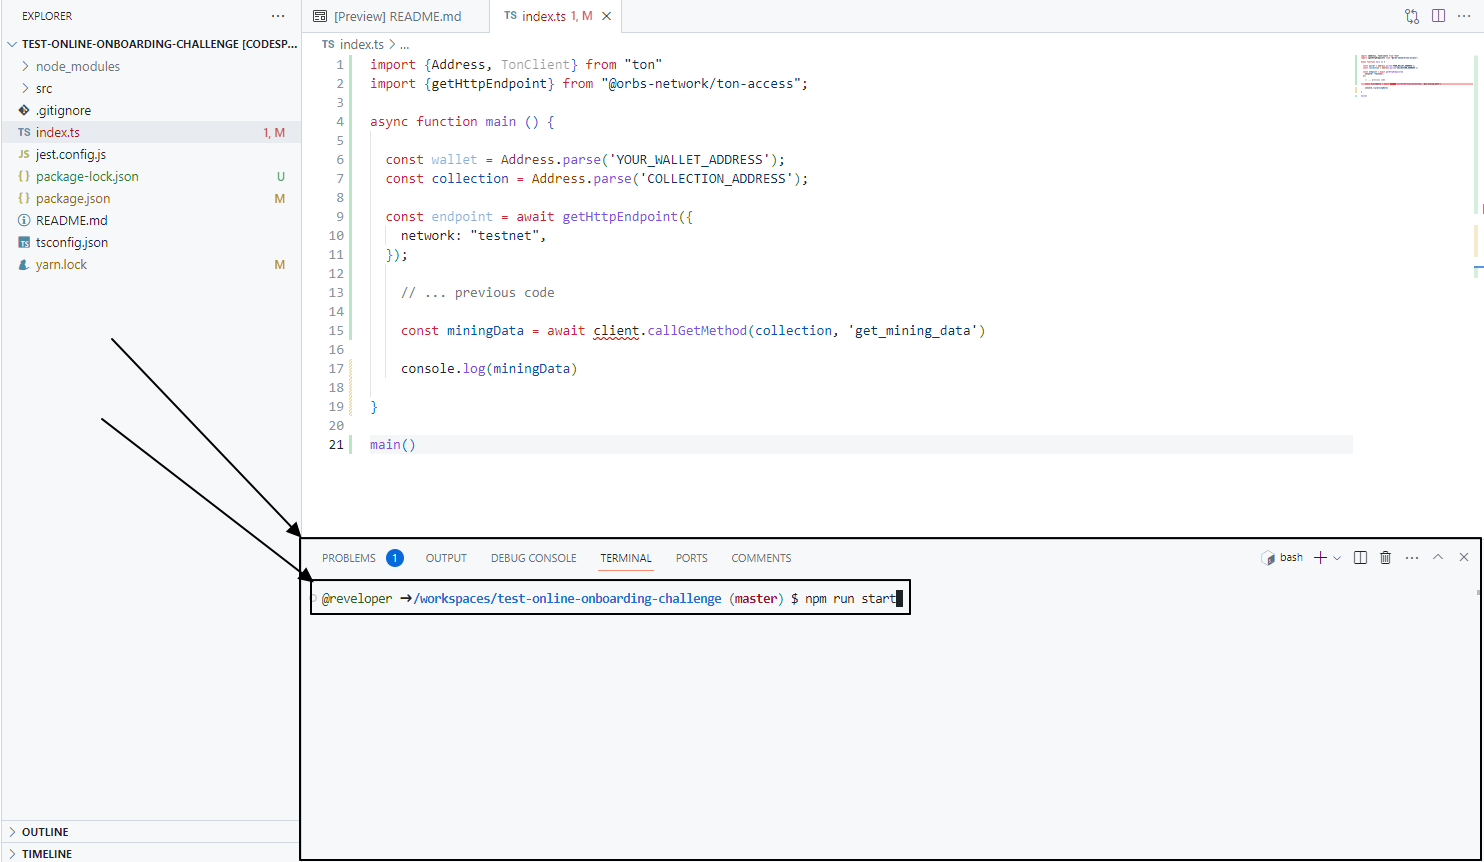
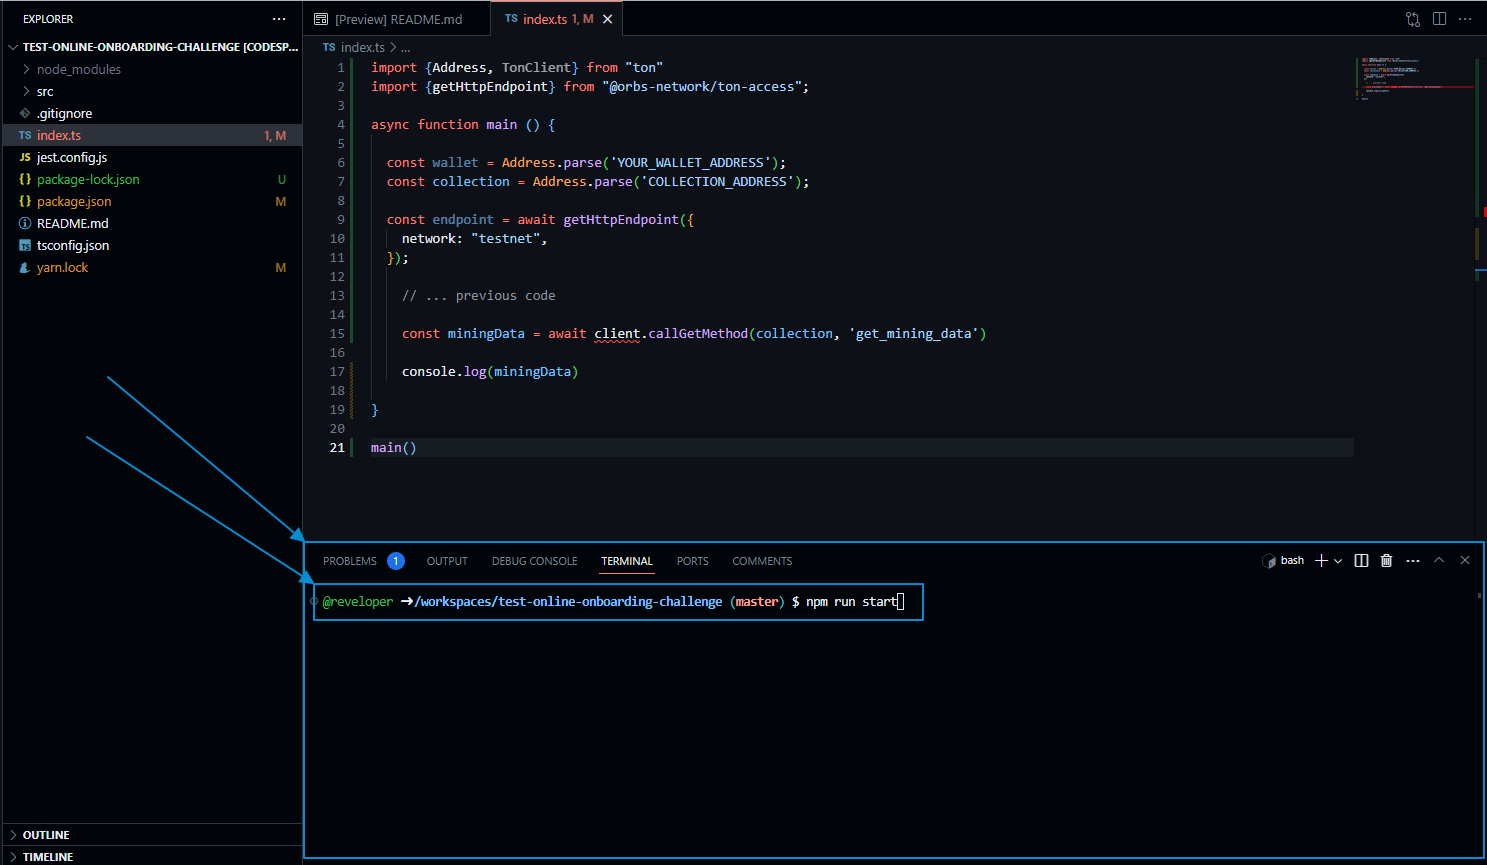
The Terminal is also available as a separate application. Please choose the appropriate version based on your IDE and OS.
Great! After these steps you're ready to get deeper into TON Blockchain secrets. 👀
🎯 Connect to TON
Okay, what do you need to connect to TON Blockchain?
- Smart contract address as a point of destination. Our goal is to mine an NFT from the proof-of-work smart contract, so we need an address to get current mining complexity.
- API provider to make requests to TON Blockchain. TON has multiple API types for different purposes. We will use the testnet version of toncenter.com API.
- JavaScript SDK: A JavaScript SDK (recall that an SDK is a Software Development Kit) is needed to parse the smart contract address being used and prepare it to create an API request. To better understand TON addresses and why they need to be parsed to carry out this process, please see this resource to understand why should we parse it. To carry out this procedure, we'll use
@ton/ton.
In the next section we’ll describe how users send their initial requests to TON Blockchain using the TONCenter API and @ton/ton to receive data from the PoW smart contract.
Smart Contract Addresses
For the miner to work correctly, we need to add two different smart contract address types. These include:
- Wallet address: A wallet address is required, because it is necessary for the miner to receive their mining reward (in this case, we must use the Tonkeeper Testnet mode).
- Collection address: A collection address is required to act as a smart contract to correctly mine an NFT (to carry out this process copy the NFT collection address, under the TON onboarding challenge collection name from the Getgems website).
Next, we’ll open the ./scripts/mine.ts file in your miner and create a mine() function composed of initial constants as follows:
import {Address} from '@ton/ton';

const walletAddress = Address.parse('YOUR_WALLET_ADDRESS');
const collectionAddress = Address.parse('COLLECTION_ADDRESS');

async function mine () {


}

mine();
Using the async mine() Function
Later in the process of creating a TON NFT Miner, several requests will be executed to the public API to relay responses to the correct string of code in exchange for the desired instructions. By leveraging the async/await function, code simplicity is improved dramatically.
Address Parsing
On TON, smart contract addresses come in different forms that employ the use of numerous flag types. In this context specifically, we’ll make use of the user-friendly address form. That said, if you are curious to learn more about the different smart contract address types, feel free to check out this additional resource in our documentation.
For the miner to work correctly, we need to add two different smart contract address types. These include:
The Address.parse() method located in the @ton/ton SDK allows the developer to create an address object to convert addresses from one form to another in a simplified manner.
Connect to an API Provider
In this step, we'll connect with TON via TONCenter (which is hosted on toncenter.com) API provider using specific commands in the script.
The simplest way to do it is buy just specifying testnet endpoint https://testnet.toncenter.com/api/v2/jsonRPC.
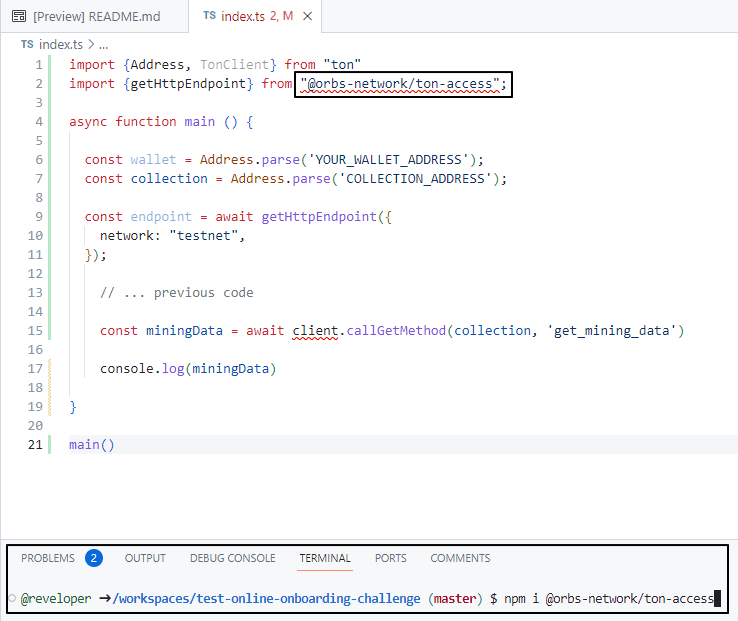
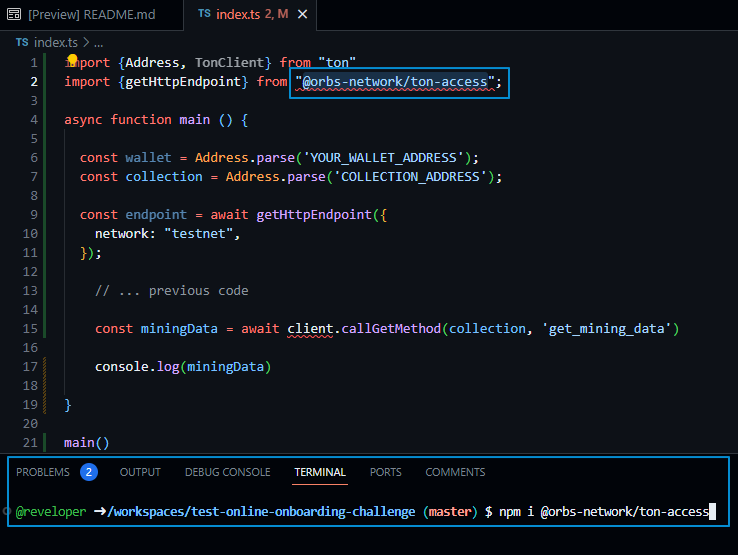
We are adding client and endpoint in the ./scripts/mine.ts script using TonClient and testnet Toncenter endpoint https://testnet.toncenter.com/api/v2/jsonRPC:
import {Address, TonClient} from "@ton/ton"

// ... previous code

// specify endpoint for Testnet
const endpoint = "https://testnet.toncenter.com/api/v2/jsonRPC"

// initialize ton library
const client = new TonClient({ endpoint });
It's better to use an RPC node provider, or to run your own ton-http-api instance for that. Read more at the TonCenter API page.
Receiving Mining Data From TON Blockchain
Finally, the next step in the process is to retrieve specific mining data from TON Blockchain.
By consulting the README file needed to complete the TON onboarding challenge, the latest TON mining data is obtained by running the get_mining_data method. Once initiated, the result will be as follows:
As a result we should receive an array with these fields:
(
	int pow_complexity,
	int last_success,
	int seed,
	int target_delta,
	int min_cpl,
	int max_cpl
)
Running Smart Contract Get Methods on TON
Using @ton/ton it is possible to run the client.runMethod(SMART_CONTRACT_ADDRESS, METHOD) function.
Running this code will result in the following console output:
// ... previous code

const miningData = await client.runMethod(collectionAddress, 'get_mining_data');

console.log(miningData.stack);
Furthermore, to run the script, it is necessary to enter the following command in the terminal:
npm run start:script
To avoid unexpected issues, make sure you have finalized all previous steps, including inputting contract addresses.
Good! As long as the above processes were executed correctly, successful connection to the API will be achieved and the necessary data will be displayed in the console. The correct console output should be initiated as follows:
TupleReader {
  items: [
    {
      type: 'int',
      value: 7237005577332262213973186563042994240829374041602535252466099000494570602496n
    },
    { type: 'int', value: 1730818693n },
    { type: 'int', value: 281644526620911853868912633959724884177n },
    { type: 'int', value: 30n },
    { type: 'int', value: 171n },
    { type: 'int', value: 252n }
  ]
}
The output above shows the data related to the execution of a process, with a collection of numerical (int) values. The current focus is to convert this numerical output into a format that is more practical for use.
We need to convert the hex output to something useful.
Warning: Though this information is highly complex and not necessary for this tutorial, if you’re interested in understanding the complex technical aspects of TON consider using these resources:
- To better understand how TON Virtual Machine (TVM) operates and how does TON process transactions, check out TVM overview section.
- Secondly, if you are interested in learning more about how transaction and gas fees work on TON, consider diving into this section of our documentation.
- Finally, to get a better understanding of the exact gas values needed to carry out TVM instructions see this section of our documentation.
Now, let's return to the tutorial!
Numerical Mining Data in a User-Friendly Format
In the section above where we discuss numerical (int) values needed to receive mining data. Before processing further received data must be converted into a more easily understandable and usable format.
As it is clear when examining the given output, numbers can be quite substantial in size. To deal with them we will use bigint (the big number implementation in JavaScript). BigInt used to work with large numbers that are larger than the maximum number integer values. Let’s use this example to get a better idea of the Mining Data required for this process:
// ... previous code

const { stack } = miningData;

const complexity = stack.readBigNumber();
const lastSuccess = stack.readBigNumber();
const seed = stack.readBigNumber();
const targetDelta = stack.readBigNumber();
const minCpl = stack.readBigNumber();
const maxCpl = stack.readBigNumber();

console.log({ complexity, lastSuccess, seed, targetDelta, minCpl, maxCpl });
As shown above, the different components of miningData use a stack-based numbers for different parameters (which will be introduced in the section below). To achieve the desired value outcome, we used stack.readBigNumber() function to read a bigint from stack.
After this process is complete, we may print values to the console. Try to run the script again by running the command:
npm run start:script
Here is an example output:
{
  complexity: 7237005577332262213973186563042994240829374041602535252466099000494570602496n,
  lastSuccess: 1730818693n,
  seed: 281644526620911853868912633959724884177n,
  targetDelta: 30n,
  minCpl: 171n,
  maxCpl: 252n
}
Let's cover the Mining Data command that is used to translate different data parameters when programming mining data into TON Blockchain. These include:
complexityis the most important number for miners. It's a Proof-of-Work complexity for the values. You're successful if the final hash is less than complexity.lastSuccessis a unix timestamp date and time representation that keeps track of the last mining transaction on TON. Each time the last_success metric changes, it's necessary to run the miner again because the seed also changes during this process.seeddenotes a unique value generated by a smart contract to calculate the desired hash. To better understand this process and learn more about how the seed changes and why, have a look at the project files folder by using the ctx_seed keyword (Ctrl+F with keyword "ctx_seed").targetDelta,minCplandmaxCplwon't be used in our tutorial. But you can always read more about how they are used in smart contracts to calculate proof-of-work complexity in the source files of the collection in your project.
Now that we understand the different parameters discussed above, we have the values(complexity, lastSuccess, seed) which we will use in our NFT Miner in the next chapter.
🛠 Prepare a NFT Miner
Hey, you're doing a great job!
After connecting to TON and retrieving the necessary mining data from the blockchain to create an NFT Miner, let’s focus on the next steps in this process to achieve our goal.
In this chapter you will prepare a mining message and calculate a hash of the message. After that, you will find a hash that's less(<) than the complexity we got from the smart contract.
That is what a miner is! Simple, isn't it?
Preparing Mining Messages
First, we must prepare a mining message by ensuring the correct parameters to ensure the validity and data integrity of this process.
Thankfully, the README file allows us to retrieve the correct guidelines needed to achieve this goal. As you can see, the above README file comprises a table with certain fields and Cell types (titled “Layout of Proof of Work Cell’) to help achieve our desired result.
Cells are data storage structures on TON that fulfill numerous purposes, including increasing network scalable and smart contract transaction speeds. We won’t get into specifics here, but if you’re interested in understanding the complexity of cells and how they work, consider diving into this section of our documentation.
Fortunately, all the data structures used in this tutorial are already written in TypeScript. Use the MineMessageParams object from NftGiver.data.ts to build a transaction with Queries:
import { unixNow } from '../lib/utils';
import { MineMessageParams, Queries } from '../wrappers/NftGiver';

// ... previous code

const mineParams: MineMessageParams = {
    expire: unixNow() + 300, // 5 min is enough to make a transaction
    mintTo: walletAddress, // your wallet
    data1: 0n, // temp variable to increment in the miner
    seed // unique seed from get_mining_data
};

let msg = Queries.mine(mineParams); // transaction builder
Probably, you have a question: where are the op and data2 from the table?
- In the table, the numerical value of data1 must be equal to that of data2. In order to omit filling the data2 value, the transaction builder performs a low-level process (see Queries.mine() sources).
- Because the
opclassification is always constant, it is already implemented in transaction builder Queries and in OpCodes. You can find the op code by going to the source code ofmine()method.
Though it may be interesting to check out the source code (../wrappers/NftGiver.ts), it is not necessary.
Creating TON NFT Miners
Now that we have completed the process to prepare messages for our TON miner, let’s jump into the initial process to actually create a miner. First, let’s consider this line of code:
let msg = Queries.mine(mineParams);
Above we compiled a msg value. The idea of mining is to find a hash msg.hash() that will be less than complexity from the last received get_mining_data(). We can increment data1 as many times as we need.
The pure miner will continue to run indefinitely, as long as msg.hash() is bigger than complexity (message hash is larger than PoW mining complexity).
Here is an example of the code running as it relates to BigInt in TypeScript:
let msg = Queries.mine(mineParams);

const bufferToBigint = (buffer: Buffer) => BigInt('0x' + buffer.toString('hex'));

while (bufferToBigint(msg.hash()) > complexity) {
    mineParams.expire = unixNow() + 300;
    mineParams.data1 += 1n;
    msg = Queries.mine(mineParams);
}

console.log('Yoo-hoo, you found something!');
We convert hash from the msg.hash() to bigint with bufferToBigint() function. This is done to use this hash in comparison with complexity.
Though the miner will work properly after the completion of the above steps, it will have a visually unappealing appearance (try npm run start:script). Therefore, we must address this issue. Let’s jump in.
Improving TON Miner Appearance ✨
We want to make the miner look sexy now! How do we do it?
Just follow me, my friend, follow me.
To achieve our goal, we’ll add these commands:
let msg = Queries.mine(mineParams); // transaction builder
let progress = 0;

const bufferToBigint = (buffer: Buffer) => BigInt('0x' + buffer.toString('hex'));

while (bufferToBigint(msg.hash()) > complexity) {
    console.clear()
    console.log(`Mining started: please, wait for 30-60 seconds to mine your NFT!`)
    console.log()
    console.log(`⛏ Mined ${progress} hashes! Last: `, bufferToBigint(msg.hash()))

    mineParams.expire = unixNow() + 300;
    mineParams.data1 += 1n;
    msg = Queries.mine(mineParams);
}

console.log()
console.log('💎 Mission completed: msg_hash less than pow_complexity found!');
console.log()
console.log('msg_hash:       ', bufferToBigint(msg.hash()))
console.log('pow_complexity: ', complexity)
console.log('msg_hash < pow_complexity: ', bufferToBigint(msg.hash()) < complexity);

return msg;
Just check it out! Let’s execute the command:
npm run start:script


Cool, isn't it? 😏
After these commands are executed correctly, we’ll have a visually appealing NFT miner. In the next section, we’ll focus on connecting a wallet to the miner to create a payment channel that can accept and receive transactions from TON Blockchain.
🎨 Prepare a Transaction
Next, we’ll outline the steps to compile a message and send it to the blockchain with your Tonkeeper wallet. The upcoming steps will guide you in completing the process of mining an NFT on TON.
Top Up Wallet Balance via the Token Faucet
To proceed to the next step, we need to acquire some TON testnet tokens. This can be achieved by making use of the testnet faucet found here.
Leverage Blueprint Transaction Opportunities
In order to ensure that the NFT mining process is carried out correctly, and that the user can store their NFT properly, we will use Blueprint to simultaneously interact with TON Blockchain and the Tonkeeper wallet.
To achieve this goal, we’ll use standard run() function to run to the creation the transaction and send it:
import { toNano } from '@ton/ton';
import { NetworkProvider } from '@ton/blueprint';

async function mine() {
  // code from previous steps
}

export async function run(provider: NetworkProvider) {
    // Do not forget to return `msg` from `mine()` function
    const msg = await mine();

    await provider.sender().send({
        to: collectionAddress,
        value: toNano(0.05),
        body: msg
    });
}
Let’s run the above script to send transaction:
npm start
Note that we are using npm start instead of npm run start:script. This is because we need to leverage advantages of blueprint (under the hood blueprint run is called).
After running this command answer to questions as shown below to connect your Tonkeeper wallet:
? Which network do you want to use?
> testnet
? Which wallet are you using?
> TON Connect compatible mobile wallet (example: Tonkeeper)
? Choose your wallet (Use arrow keys)
> Tonkeeper
Scan the QR code shown in the terminal with your Tonkeeper wallet to establish a connection, no transaction will be sent yet. Once connected, confirm the transaction in Tonkeeper.
Do you sense the experience in the air? That's you, on your way to becoming a TON developer.
⛏ Mine an NFT With a Wallet
There are two main ways to mine an NFT on TON:
Simple: NFT Testnet Mining
Below are the steps needed to initiate your first Testnet transaction to mine your NFT:
- Activate Testnet mode within your Tonkeeper wallet
- Input our testnet wallet address from Tonkeeper into
walletAddressvariable in the./scripts/mine.ts - Input address of the NFT collection from Testnet into
collectionAddressvariable in the./scripts/mine.ts
Mine A Testnet NFT Rocket
In order to successfully mine an NFT rocket on Testnet, it is necessary to follow these steps:
- Open the Tonkeeper wallet on your phone (it should hold some newly received TON Testnet tokens).
- Select scan mode in the wallet to scan the QR code.
- Run your miner to acquire the correct hash (this process takes between 30 and 60 seconds).
- Follow steps in Blueprint dialog.
- Scan the generated QR code from the miner.
- Confirm the transaction in your Tonkeeper wallet.
Because other developers may be carrying out the same process in an attempt to mine their own NFT, you may need to try the process a couple of times to succeed (as another user could mine the next NFT available right before you).
Soon after initiating this process, you will have successfully mined your very first NFT on TON (it should appear in your Tonkeeper wallet).
Welcome aboard, a true TON Developer! You did it. 🛳
Genuine: NFT Mainnet Mining
Hey! For those who wish to mine an NFT on TON Mainnet, these instructions should be followed:
- You have activated mainnet mode in your Tonkeeper (it should hold at least 0.1 TON).
- Input our mainnet wallet address from Tonkeeper into
walletAddressvariable in the./scripts/mine.ts - Input address of the NFT collection from the Mainnet into
collectionAddressvariable in the./scripts/mine.ts - Replace endpoint to the Mainnet:
// specify endpoint for Mainnet
const endpoint = "https://toncenter.com/api/v2/jsonRPC"
Mine A Mainnet NFT Rocket
Like we outlined in the testnet NFT rocket mining process, in order to successfully mine an NFT rocket on mainnet, it is necessary to follow these steps:
- Open the Tonkeeper wallet on your phone (remember, it should hold some TON tokens).
- Select scan mode in the wallet to scan the QR code.
- Run your miner to acquire the correct hash (this process takes between 30 and 60 seconds).
- Follow steps in Blueprint dialog.
- Scan the generated QR code from the miner.
- Confirm the transaction in your Tonkeeper wallet.
Because there may be other developers carrying out the same process in an attempt to mine their own NFT, you may have to try the process a couple times to be successful (as another user could mine the next NFT available right before you).
After some time, you will have mined your NFT and become a TON Developer in TON Blockchain. The ritual is complete. Look at your NFT in Tonkeeper.
Welcome aboard, a TON Developer! You did it. 🛳
🧙 What's next?
First, take a rest! You did a big task! You are a TON developer now. But it's only the beginning of the long way.
See Also
After finishing the TON onboarding challenge where we successfully mined an NFT, consider taking a look at some of these materials that detail different portions of TON's Ecosystem:
- What is blockchain? What is a smart contract? What is gas?
- TON Hello World: Step-by-step guide for writing your first smart contract
- Develop Smart Contracts: Introduction
- [YouTube] Ton Dev Study - FunC & Blueprint
- How to work with wallet smart contracts
- FunC Journey: Part 1
- Bot for sales of dumplings
- Mint Your first Jetton
- Step by step NFT collection minting
- How to run TON Site
You are one of the first explorers here. If you find any mistakes or feel stacked, please send feedback to @SwiftAdviser. I will fix it ASAP! :)
